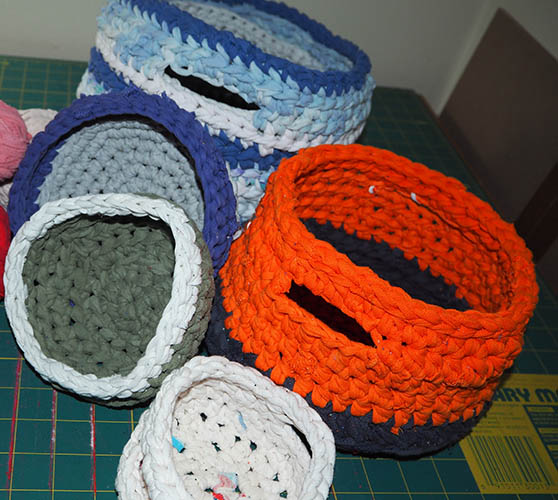
Autumn’s well and truly here and there’s a distinct nip in the air in the evenings and early mornings.  MissMolly’s noticed the change and isn’t impressed:  Doberman’s really don’t like the wet or the cold! 

But it’s not just MM that’s noticed the change in the weather. At work and at home I hear comments about the shorter days, longer nights and that winter’s definitely on the way. Doonas are coming out of storage, blankets are going back on beds and jumpers and scarves are back in fashion.

So what do people who’re living rough do when the chill weather starts to roll in? And is there something we, as a community, can do to help?

The start of an answer to these questions came to me when a couple of friends donated a whole lot of 8ply yarn and some completed crocheted granny squares, suggesting that I ‘put them to good use’.

Right. The logical thing was to turn the rest of the yarn into squares too. Then we use those to make small blankets and donate them to the local support services to distribute to people in need.

I recruited a group of people who already knew how to crochet, learned the basics myself and we’ve been crocheting in what seems like every spare minute ever since. Between us we’ve produced a large number of squares, taught a few people how to crochet and completed several blankets.

Each square takes about an hour to make. We’ve chosen to make our blankets 5×6 squares, so that’s approximately 30 hours of crochet per blanket. Then the squares are crocheted together, a border is added all the way around and all the little yarn-tails are sewn in to tidy things up. This probably adds at least 10 hours to each blanket, making it about 40 hours per blanket. 

FAQs

Will there be enough blankets for all those in need? No, never.

Will they be appreciated? Yes, most definitely.

Will they be looked after and last? It really doesn’t matter, does it? They’re gifts, made with love and hope for people in need. It’s enough to have been able to make them.

Will we continue? Yes. The need hasn’t gone away and won’t in the short term.

Can others join in? Please do. We have spare yarn and crochet hooks. Join us for our monthly community craft session if you can, otherwise work on squares when you have spare time and let us know when you’d like them picked up.

How to crochet a granny square for our community blankets

You’ll need: 8 ply acrylic yarn, 4mm crochet hook, small pair of scissors  and some spare time

Instructions: We’ll teach you how at our craft sessions (1st Friday of each month, 7 – 9pm), or you can use either the video instructions or step-by-step ones. They’re both good introductions to making basic granny squares.

Size: Try for 10 rounds per square – and it’s up to you to choose whether to make them all one colour or to do them in a variety of colours. 

In short, we could really do with some more crocheters to help us out. Every square created gets us one step closer to another blanket and another person kept warm this winter. So if all you do is make one square, it’s one square more towards a great outcome.

My first adventures into mosaic were under the guidance of the wonderfully talented and eccentric Evi Ferrier in 1998. She facilitated a workshop series in which a whole lot of volunteers helped to mosaic the front of the art shed at Glyde-in Community Centre in East Fremantle. That’s me in the purple tie-dyed shirt and hat, creating my very first gecko mosaic, with Evi sitting alongside me filling in some of the background and offering encouragement.

Some years later I attended another workshop with Evi, this one at her home in Mosman Park. She introduced us to a book called The Big Orange Splot, by Daniel Manus Pinkwater. It’s a rather cute children’s picture book and Evi read it to us to encourage us to be bold in our creations. The main character in the story is Mr. Plumbean, a man who paints his house to reflect his dreams rather than fitting in with the rest of the neat little box-houses in the street.

It was clear from Evi’s (very unusual) decor that she had taken Mr Plumbean’s example to heart. The house is mosaiced from top to bottom, inside and out, and it clearly does reflect her dreams. The bottom of the swimming pool, the garden walls, the sides of the house, internal walls – it’s a visual overload. That day, I came home and created my own orange splot house mosaic – both as an homage both to Evi and as a reminder to myself to remember be more like Mr Plumbean.

Having said that, I must confess that my own house is actually pretty mundane. It’s my garden that reflects my reluctance to be boring. It’s random and untidy and completely at odds with my oh-so-tidy neighbourhood – and I revel in it. This even extends to the verge outside our garden wall, where I grow sweet potatoes, loquats, strawberry guavas, rosemary, pigface (carpobrotus glaucescens) – and the grass I can’t quite seem to get rid of.

Every season brings something new in some part of my garden. Most days I go outside at least for a while, sometimes with a cup of tea and a book or (more often) to play with the hyper-active dogs. I inevitably see something I can tweak: a branch to prune, a plant to move or repot, some herbs that need picking, or a flower to photograph. The whole thing is an ever-evolving work-in-progress that makes me smile every single day. No exceptions.

Do you have dream – and does your house or garden reflect that vision?

GenghisCon is a project that’s been dear to my heart since it’s inception in 2001. I’ve watched it grow and blossom from a fledging idea hatched in our lounge room into a full-grown, successful annual convention.

It’s fun to see what the changing committees come up with in terms of ideas for convention activities each year and how much the Genghis-community pitches in to help out.

With the 2o17 GenghisCon on the horizon, I’ve volunteered my services to be ‘Market Day Liaison’. This is really just a fancy (and short) title for trader-wrangler and organiser of fun stuff associated with the market day.

I want to make the market day to be a draw card and have some cunning plans in mind. I’m thinking that having some entertainment to entice people into the market area would be fun. Perhaps a few different items/events, each running just enough to be entertaining and draw the crowd in. We could have some roving minstrels, a fairy floss machine, random juggling, handouts of cookies (baked by moi and other lucky ‘volunteers’), a raffle… and whatever else I can come up with.

This will take a little while to plan, so I’m starting now to avoid the aargh-factor later on. What I’d REALLY like is to get some help from anyone with ideas / time (just some) / creative spirit / musical and/or juggling abilities. Help?

GCon Traders 2017

A couple of years ago I took part in a one-day linocut workshop in the Swan Valley. I headed home on a high of creative inspiration, full of plans to print up a series of Xmas cards. I’d get some lino and carving tools, create a couple of designs, then print them up in various colours… Voilà!

linocut wkshop_25oct14

But, when it came time to carve, I found that the lino I’d bought was very different to the medium we’d used in the workshop. Silk Cut Lino  is advertised as being ‘easy and pleasurable to use’ – but I found it significantly harder (stiffer) than expected and really quite tricky to carve. It may have simply been my novice technique, but the cuts were disappointingly wobbly.

Of course, in my excitement, I’d bought quite a LOT of the lino… the not-so-easy-or-pleasurable to use lino. So I ended up simply put the whole idea on hold for later…

Time passed… and then a friend sent me some information on a (free) linocut demonstration at Jacksons Art Supplies last week: “Printmaker Shana James will be in store this Friday to demonstrate how to carve and hand print a lino block. Come and see how Shana creates her beautiful whimsical lino prints.”

Shana’s linocuts are lovely – and whimsical, my favourite being the charming hand-coloured pink and green tricycle. It’s such a joyful, light-hearted image 🙂

Shana James linocut tricycleWe didn’t actually get to see a print being carved, but she did demonstrate the printing process, using one of her existing designs. She also showed us a process for adding colour to lino prints called Chine-Collé. Using a glue stick, Shana rubbed some glue on one side of a small piece of very fine, hand-inked rice paper and then placed the glue-free side directly onto the inked-up linocut block.She then added a second layer of (different) coloured rice paper over the top of the first.

Shana James Chine-collé1The next step was to place the printing sheet (plain paper) carefully over the top of all this, effectively sticking the coloured paper to the printing sheet. Shana then used the back of a spoon over the whole design to transfer the ink to the printing sheet before lifting it off the linocut. Magical!

Shana James Chine-collé2Shana’s pro-tip re carving lino that’s really stiff? Warm the lino to soften it. She suggested a number of ways of doing this: iron the lino, using a low temperature setting, with a layer of paper or fabric between the iron and the lino; warm a wheat bag in the microwave oven and lay it on the section of lino you’re about to carve; or leave the lino in the sun for a little while. So simple!

This means that linocuts are  back on the agenda – possibly even for Xmas cards this year. I’ll start with a test piece next week and see how I go.

Having completed puppy school last month, we enrolled Cassie in the beginners obedience classes at the Southern River Dog Club for the next step. The class is quite large (about 30 dogs), so it’s demonstration/instruction-based for the most part and there’s not a lot of individual attention. But that’s okay, since the class is as much about exposing Cassie to lots of dogs and people as anything else – and our young lady is already up to speed with a few commands (sit, wait, leave, come) and walks happily (albeit a little too enthusiastically!) on lead. So class one was mostly about Himself and Cassie familiarising themselves with clicker training.

The only gotcha of the evening was that the trainers had requested that we bring along a training-specific toy. They suggested something along the lines of a simple tug-toy that was to be used at dog school – not at home. Since we hadn’t bought one – and pet stores were closed by the time we realised this – we had to come up with a last minute cunning plan.

Himself described what he was after: a woven or plaited fabric rope, soft enough to not hurt Cassie’s mouth but sturdy enough to withstand her piranha-teeth. So, with precious little time to spare, I hunted through my fabric scraps and found a narrow strip of fleece that looked like it might work. Step one was to cut it into strips… but then we were faced with the problem of how to turn those into some semblance of a tug-toy. This is about when I had a Eureka! moment…

I remembered a knotting craft that was all the rage when my own kids were at primary school:  Scoubidou (Scooby-do). It’s a cheap, colourful, useful and, above all, quick and easy way of creating a woven item. To minimise craft-talk confusion, I hunted down a simple instructional video and Himself got to weaving. Since the fabric scraps I’d scrounged up weren’t very long, the toy turned out a little shorter than we’d hoped – but it was well and truly ready in time for school. A recycling win – both the fabric and the weaving method 🙂

Yesterday I took it one step further. I scrounged through the bargain bin at our local fabric store and, for the princely sum of $8, acquired a couple of pieces of fleece fabric offcuts. Next was a quick interwebs search to see if anyone else had ever made such scoubidou-style fleece tug-toy.

I was astonished to find that not only have (many) others made similar toys, many of those crafty-folk have shared their techniques on blogs and in videos. I perused a couple and then, Scoubi-muscle-memory refreshed, I knocked up two slightly longer, snazzy-looking tug-toys whilst watching TV last night.

DIY tug toy

If you’d like to try one yourself, this is what I’d suggest:

  • Scrounge down some fleece offcuts – ideally these should be at least one metre long or your toy will end up more of a cat toy than a puppy toy.
  • I’d suggest you check the bargain bin at your local fabric store unless you’re feeling super precious about colours/designs.
  • Tip: the weaving will be a lot simpler if you have two different colours to weave with.
  • Cut four strips of fleece (two of each colour), about 5cm wide and as long as the fabric.
  • Tip: You don’t need to be too precise about the width – it’s not super important.
  • Line up one end of the strips and knot them together really firmly.
  • Now start your fleece-scoubidou tug-toy. It’s done in square (box) stitch, the building block of most scoubis.
  • Essentially, the trick is to isolate the individual strands (strips of fleece). Do this by pushing one to the back (1), one to the front (2), and one to each side (3,4) – and then keeping track of them.

DIY tug toy showing strands

  • Tip: make sure you pull the strands tight after every weave row – this keeps the tug-toy firm.

DIY tug toy showing weave

  • When you get to the length you’re happy with, tie the strands off in a tight knot and trim them.
  • Tip: leave a reasonable amount at the end to tie your knot – it takes more fabric than you’d think.

Of course, if you don’t want to make one you could just ask me to knock one up for you… especially if you already have some suitable fabric. Although, since I only used a very small amount of the fleece I bought, I’d be happy to use that up 🙂