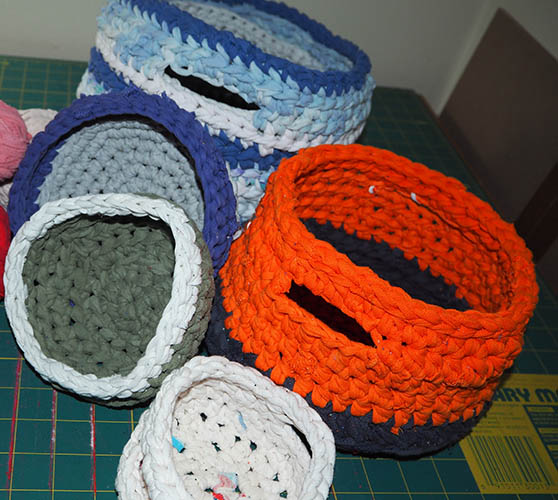
With Himself off in foreign climes for the past few weeks, life has been interesting in a number of ways. It’s also been random and chaotic, so cooking just for myself has seemed like an unnecessary add-on to already overly busy days. To ensure I do actually eat, I came up with a cunning plan: pressure cooker soup. Each weekend I’ve cobbled together some or other variety of soupy-goodness, popped it in the fridge and then consumed it over the following week. I’ve had chicken and barley, mixed vegetable and, last week, pumpkin. All quick, easy, nutritious and very satisfying to come home to. Win all round.

So when I saw that Chef Dale Sniffen was running a pressure cooker workshop last week, I immediately signed up in the hopes of some inspiration for other quick and easy options. As it turned out, the vehicle he chose to showcase pressure cookers was… pumpkin soup, which was quite amusing.

Admittedly there’s not a whole lot of technique to pumpkin soup. It’s one of those things that pretty much anyone can make. But we were treated to an entertaining couple of hours of his company and a wealth of cooking tips while Dale first made pure bone chicken stock, then used that to make his soup. Although the soup itself only took six minutes in the pressure cooker, the process of getting it to that point was all high theatre.

First came the caramelizing of the onions, with appropriate audience appreciation of colour and aroma. Then the adding of tomato paste and the slow simmer to bring out the intense tomato flavour in that before adding the ginger, nutmeg and bay leaf. More audience participation. Dale then deglazed the pan with the ‘richly aromatic and flavourful’ pure bone chicken stock. This achieved it was – finally – time to add the coarsely chopped pumpkin and potato, bring it all to the boil, attach the lid and wait for it to get up to pressure.

Six minutes later Dale ran cold water over the pressure cooker to achieve a fast pressure release, blitzed contents with a stick blender, stirred in some chopped butter, salt and (white) pepper – and we finally got to taste the result. He plated up his creation, garnished it with sour cream and sesame seeds, then served it with pieces freshly made flat bread – which was exceptionally good: soft yet crunchy, slightly salty and a perfect accompaniment to the soup.

I’ll definitely make the flat bread next time I make pumpkin soup, but I think I’ll stick to my tried-and-tested version, adapted from a recipe I found in 2008 (according to the notes I’ve scribbbled on it). Like Dale’s it can be made in a pressure cooker or in a conventional saucepan (which just takes longer). But it’s significantly simpler – which works for me. Let me know if you try either/both of the recipes – I’d be interested in some feedback.

Nik’s Thai Style Pumpkin Soup

What you need: 1 tablespoon extra virgin olive oil
, 2 medium brown onions (peeled and coarsely chopped
), 2 cloves of garlic (diced), 
2cm fresh ginger (peeled and sliced), 2 tablespoons red Thai curry paste (I’ve used green, but prefer the red)
, 1 large butternut pumpkin (washed, de-seeded and roughly chopped – don’t bother to peel it), 2 litres of chicken or vegetable stock (pure bone stock probably is best, but a couple of stock cubes and some water works fine), 1 packet dried coconut milk, reconstituted with water (or a 400ml can, if you prefer – but the dried stuff is a terrific pantry standby), juice of 1 lime (use lemon if you don’t have a lime to hand).

To make the soup: Heat a tablespoon of oil in your pressure cooker, then add the onions, garlic, ginger and curry paste. Cook, stirring gently over a low heat for about five minutes to release the flavours. 
Add the pumpkin chunks. Stir well, then add up to 2 litres of the stock – depending on pumpkin size (You want your pressure cooker at least 1/3 full and no more than 2/3 full). 
Stir well and bring the mix to the boil, then put the lid on the pressure cooker and let it come up to full pressure. At this point it’s important to reduce the temperature to low, then leave the pot at pressure for about six minutes.
 I usually just turn the heat off after this and leave the pressure to come down all by itself, but you can release the pressure more rapidly if you’re in a hurry by placing the pressure cooker in the kitchen sink and running cold water over the top of it. Once the lid’s off, blitz the soup to smooth paste, then return pot to the stove (no lid) and add the coconut milk and lime juice.
 Garnish with chopped fresh coriander when you serve it, along with a dollop of plain yoghurt, but as often as not I don’t actually bother. The soup is tasty as is.

Dale’s (delicious) Plain Flour Flatbreads

What you need: 500g (strong) plain flour (i.e. high in protein), 310ml water (weird amount, I know, but there you go), 7g active dry yeast, 2 teaspoons sugar, 1 teaspoon salt, 4 tablespoons olive oil, black peppercorns & some fresh rosemary leaves.

To make the bread: Place everything except the spices in the bowl of your electric mixer and, using the dough hook on low speed, mix for about 30 minutes. The dough should be soft but not too sticky. Cover and leave to rise overnight then turn the dough out, add the spices and knead until smooth. Divide into 6 equal portions and roll these each of these out into a (more or less) 15cm square shape, then pull and turn each one with your – shaping each one into something that resembles a (small) pizza base, less than 1cm thick. Melt about 100g of chopped butter and set this aside. Pop your frying pan on the stove and heat enough olive oil to just coast the bottom, then add your first flat bread. Cook for about 1- 2 minutes, until it starts to bubble up, then flip over to cook the other side – this doesn’t take very long. While side two is cooking, brush melted butter on side one (the cooked side) and sprinkle that liberally with freshly ground sea salt. Stack the cooked flatbreads until they’re all done, then slice into triangles and serve with your hot pumpkin soup.

NOTE 1: If you’re cooking for one, just cook one of the flatbreads and pop the other five rounds in the fridge or freezer for another day. Or cook them all, eat as many as make you happy and save the rest for the next time 🙂

NOTE 2: You can actually use any (unpeeled) pumpkin you like – butternut happens to be my preference.

NOTE 2: To make Naan, simply replace the water in the bread recipe with plain yoghurt.

Since I’ve rather cleverly managed to end up with several part-time jobs (all at the same time), pups that need vets, walking and endless cuddling, and in-laws to keep an (active) eye on, normal things like grocery shopping, visits to the GPO for stamps, going to the gym, cooking and socialising have all taken a back seat for the moment. Pretty lame excuses, I know, dear Pen Pal, but there it is. So, until I have a little more free time, a quick-fix postcard to keep you going. Enjoy. Perhaps I’ll make the next one a recipe card – that’s almost like cooking, right?


My first adventures into mosaic were under the guidance of the wonderfully talented and eccentric Evi Ferrier in 1998. She facilitated a workshop series in which a whole lot of volunteers helped to mosaic the front of the art shed at Glyde-in Community Centre in East Fremantle. That’s me in the purple tie-dyed shirt and hat, creating my very first gecko mosaic, with Evi sitting alongside me filling in some of the background and offering encouragement.

Some years later I attended another workshop with Evi, this one at her home in Mosman Park. She introduced us to a book called The Big Orange Splot, by Daniel Manus Pinkwater. It’s a rather cute children’s picture book and Evi read it to us to encourage us to be bold in our creations. The main character in the story is Mr. Plumbean, a man who paints his house to reflect his dreams rather than fitting in with the rest of the neat little box-houses in the street.

It was clear from Evi’s (very unusual) decor that she had taken Mr Plumbean’s example to heart. The house is mosaiced from top to bottom, inside and out, and it clearly does reflect her dreams. The bottom of the swimming pool, the garden walls, the sides of the house, internal walls – it’s a visual overload. That day, I came home and created my own orange splot house mosaic – both as an homage both to Evi and as a reminder to myself to remember be more like Mr Plumbean.

Having said that, I must confess that my own house is actually pretty mundane. It’s my garden that reflects my reluctance to be boring. It’s random and untidy and completely at odds with my oh-so-tidy neighbourhood – and I revel in it. This even extends to the verge outside our garden wall, where I grow sweet potatoes, loquats, strawberry guavas, rosemary, pigface (carpobrotus glaucescens) – and the grass I can’t quite seem to get rid of.

Every season brings something new in some part of my garden. Most days I go outside at least for a while, sometimes with a cup of tea and a book or (more often) to play with the hyper-active dogs. I inevitably see something I can tweak: a branch to prune, a plant to move or repot, some herbs that need picking, or a flower to photograph. The whole thing is an ever-evolving work-in-progress that makes me smile every single day. No exceptions.

Do you have dream – and does your house or garden reflect that vision?

It’s fairly commonplace these days for projects, events and endeavours to be crowd-funded. This involves raising a specific amount of money from (usually) a large number of people. It’s not a new idea, but has really taken off in the last 10 years or so. It’s allows artists, writers, developers, etc. to engage directly with their audience via fundraising platforms such as Kickstarter, IndieGoGo, and CircleUp and so on.

In simple terms, the entrepreneur – let’s call her/him Sasha – comes up with an idea (otherwise known as a cunning plan) and selects a funding platform. Next s/he sets a time frame and a financial target, factoring in the 5 – 7% fee that many crowdfunding sites charge.

Next comes creating a succinct and persuasive sales pitch. For the best outcomes, Sasha needs to have a clear message – one that tells a good story and makes people care about the developer and the product. This really means s/he needs to know the target audience and is prepared to use social media to effectively promote the project, create awareness, generate a buzz-factor around the product/idea, and then sustain that by posting regular updates.

Ideally, lots and lots of people then rush forward to pledge an amount towards the goal 🙂

Sometimes the pledges are simply a set donation, but in many cases it’s in exchange for some sort of promised reward – the larger the pledge, the greater the reward. No funds (or rewards) actually change hands if the target goal isn’t achieved within the set time frame.

In my experience, the rewards that are offered as incentives have ranged from a signed letter of thanks to a range of products/services. Many people choose not to select a tangible reward at all, depending on the project and/or their relationship with the developer. In the best of circumstances the projects go ahead, rewards are received, most ‘investors’ are at least fairly happy with the outcome – and the crowd-funding ball keeps on rolling.

Over the years I’ve noticed that other sorts of funding have emerged. One of these is Patreon, which is really aimed at funding ongoing content creation via monthly subscription. This helps artists and creators to focus on content creation, rather than trying to fit their art in around day jobs. It’s simply a modern take on the notion of arts patronage, where artists receive encouragement and financial aid from supporters / philanthropists.

GoFundMe is a somewhat different sort of fundraising. It allows people to launch funding campaigns for medical procedures, emergency help, charities, educational opportunities and so forth. In many instances, people are more than willing to help out wherever they can without expectation of reward. It often depends on what the fundraising rationale is and whether it inspires us or simply gives us a feeling of obligation.

For example, a friend’s sister periodically raises money for her ongoing medical needs this way. Someone else I know is raising funds for a trip overseas. Another needed help to pay emergency vet bills when her dog was hurt. How would I choose who to fund?

Some of these feel like a hand-out, rather than a hand-up. But others, such help with the vet bills, no so much. That particular person felt very uncomfortable asking for money – it felt very much like begging to her. But she needed the help. So she offered to make beautiful handmade earrings (or something similar) for anyone who pledged their help. This made it easier for her to ask for help – and for her friends/family/others to provide it without an overt sense of obligation.

This works for me. It feels like I’d giving a hand up, as though something positive and useful is being done by all concerned. I’d definitely have helped this young lady out if I’d known in time – and not bothered to take up the incentive. The offer would have been enough. Although she does make great earrings….

My sister’s a great fan of all things quince. The first time she tasted it was when she was living in Angola many years ago. She was out shopping and bought a tin of what she thought was marmalade. The tin was labelled in Portuguese and, as she was still learning the language, she understandably thought that marmelo meant marmalade. As it turned out, it meant quince paste – also known as quince cheese.

She was an instant convert and went on to track down the raw fruit, finding the flavour astringent, rather tart and very much to her taste. I, however, had only ever tasted quince jelly (jam) until fairly recently and wasn’t overly impressed with it. But that was before I tried my hand at all things quince…

It all came about because friends of ours (Don and Ann) have nine mature quince trees on their property down in Collie, about 200km south east of Perth. A few weeks ago, when the bulk of their fruit was ripe, they decided to put a halt to trail of destruction that the local bird life was inflicting on the crop. To this end, they spent a couple of weekends stripping the fruit off all nine trees – and ended up with a LOT of surplus-to-requirement fruit.

So, one Sunday evening, the phone rang. It was Don, and the conversation went something like this: ‘Hello? Nik? Are you guys interested in some quinces? I have a few in my car and I’m half way back to Perth…’ ‘Sure, why not?’, said I, somewhat naively. ‘I’m sure I can do something with them…’

Don and his fruit-mobile arrived a couple of hours later. When I exclaimed at the quantity of fruit he presented us with, he just laughed – then told me I should see what was still in his car! Our share was four large carry bags of fruit, each bag containing about 45 quinces. This equated to approximately 9kg per bag (we weighed them!), which means we had in the region of 36kg of quinces in our fridge… and no idea what to do with them.

The fridge smelled terrific but I found that I don’t enjoy the fruit raw. Since I can’t bear to waste food, it became my mission to find out how to prepare it. I started by researching quinces and quince trees in general. I discovered that they’re related to roses, apples, pears, almonds, plums and apricots – that was a surprise. The trees are deciduous, hardy and drought-tolerant. They don’t require much maintenance (such as pruning, spraying, etc.), are self-pollinating and thrive in wide variety of climates – from temperate regions all the way through to the sub-tropics.

Quinces can be stored for up to three months in the fridge. They’re strange-looking fruit – a little like a cross between an apple and a pear in shape. But they’re slightly knobbly and their skin is both waxy and slightly furry to the touch. As the fruit ripens it goes from a light green to a lovely golden yellow and becomes surprisingly strongly and sweetly perfumed. It’s a very solid/dense fruit, but I’ve found that it bruises surprisingly easily – so some care is required when handling and preparing it.

I managed to offload about dozen or so fruit to DaughterDearest and saved a few for my sister, but have managed to process almost all the rest (we have about ten left). I discovered that the flesh, which starts off butter-coloured, turns pink and then a deep red when cooked – that was a surprise. My first adventure was quince paste – this was an epic endeavour that took thirteen hours all up. The slicing, dicing, cooking, stirring, pureeing and reducing took about seven hours. After this the mixture it went into a low oven for a further six hours to finish setting. Wow. The upside is that quince paste makes a great addition to cheese platters and keeps really well – which is lucky, since we now have a freezer full of it!

Next I tried two varieties of fruit leather – one spiced with cardamom, cinnamon and so forth, and the other with honey and lemon. Both turned out really well and we have a whole heap of that in the fridge.

We’ve also been eating slow-poached spiced quince on our muesli & yoghurt every morning for the past couple of weeks and I even made a quince (and almond) cake at the weekend. That was super-tasty too and well worth repeating. A big stride forward was to find that the fruit can be pressure cooked to save time, although I only found that out towards the end of the production line. I’ll know better next time.

All in all, I feel I’ve conquered quinces and done justice to Don and Ann’s gift of (36kg!) of quinces – but it’s definitely time to move on to other culinary adventures 🙂